
By Nelson Garcia and Carl Adams
Have you ever had the need to automatically create multiple snapshots\still images of a video to later use in court or perhaps to analyze the image from that video? We know programs such as VLC can take single snapshots of a video while the video is playing but what if I want to take a snapshot every 10 or 30 frames or even every 10 or 30 seconds of a particular video? Here are three programs that you can use to automatically save multiple snapshots from a single video.
1) Creating Automatic Video Snapshots with VLC
https://www.videolan.org/vlc/download-windows.html
You can take a single snapshot of a playing video in VLC by pressing [shift+ s]. However, VLC can also be configured to take snapshots of a video at specific intervals by using the ‘Scene video filter’ setting. A little change in the advanced settings and some calculations are required for screenshots periodically. VLC can only be set to take snapshots at a specific frame interval, so if you want to take a snapshot at a specific time interval, you will need to know how many frames are in one second of video (the “frame rate,” expressed in “frames per second” or “fps”), and then do a little math to figure out how many frames will pass during your desired time interval. The easiest way to find the frame rate for most videos is to right-click on the file in Windows File Explorer and select “Properties”. Select the “Detail” tab in the window the pops up and you should see the frame rate listed. Alternatively, you can find the frame rate in VLC by opening the codec information (Tools > Codec Information (Ctrl + J).
Listed below are the steps to take automated screenshots from the VLC player at regular intervals
- Go to ‘Tools > Preferences (CTRL + P)
- Click on ‘All’ to show the ‘Advanced Preferences’

- Select ‘Video’ from the left

- Under ‘Snapshot’ browse and ‘Select’ folder to specify ’Video snapshot directory’. You may enter a path or leave blank. If left blank snapshot images will go to your “Pictures” directory.
- Expand and navigate to the ‘Video > Filter’ from the left

- Check on the box ‘Scene Video Filter’
- Expand more, ‘Video > Filter > Scene Filter’. Here you can select the file name prefix. The default is set to “scene”. The “Recording ratio” field is used to set the frame interval for your snapshots. Here’s where the math comes in. To determine the Recording ratio, multiply the frame rate of the video by the number of seconds you want between snapshots. For example, to take a snapshot every 10 seconds of a 30 fps (frames per second) video, you need to enter 300 (30 fps x 10 seconds) as the ‘Recording ratio’. For a snapshot every 5 seconds of a 24 fps video, enter 120 (24 fps x 5 seconds) as the Recording ratio. To get one snapshot every second, just enter the frame rate in the Recording ratio field.
- Hit ‘Save’ to save the changes.

After this, when you hit ‘Play’ after opening a video, VLC will take snapshots automatically at the interval you set. It will save the images\screenshots in the user’s picture directory by default or in the directory you set in step 7.
One caveat: These settings stick and VLC will take snapshots for any video that is played afterward. To disable this, go to ‘Advanced Settings’, and disable the Scene Video filter by unchecking the box from step 6. If you play a lot of videos, it is recommended you turn this feature off and ONLY enable it when needed.
Done!
2) Creating Automatic Video Snapshots with Shutter Encoder
Just like VLC, you can configure Shutter Encoder to take snapshots at specific intervals in a video. Start by importing the video into Shutter Encoder. Find the frame rate of the video by right-clicking on the imported video selecting “File(s) Information”. This will open a window displaying information about the file. Under the General section you will see the “Frame rate” setting.
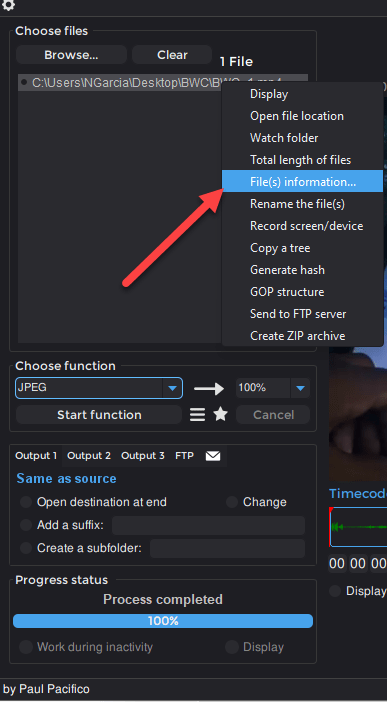

Once you know the frame rate of the video file, close the File Information window. Select either JPEG or Image under Image Creation as the Function. Go to Image section (top right-hand corner) select Source and check “Create an image sequence from a video”. In the “Interpret video footage to:” section, enter the frames per second (fps) desired. Shutter Encoder differs from VLC in that here, we are setting how many frames we want from each second of video instead of how many frames we want between each image. For example, selecting 30 will yield 30 screenshots for every second of the video, in other words, every frame from a 30 fps video. Entering 1 fps will give you one snapshot for every second of video. 2 fps will give you a snapshot every half-seconds, and so on. The higher the number the more frames and the longer it will take to complete. No need to play the video. It will create a sequence of images in the same folder as the original video.


If you want less than one screenshot per second, try using decimals. For example, .5 will yield one snapshot for every 2 seconds of the video. Divide 1 by however many seconds you want between snapshots to get the decimal FPS.

Done!
3) Creating Automatic Video Snapshots with Potplayer
https//:www.potplayer.daum.net/
Another free program you can use to take automatic video snapshots is PotPlayer. Open PotPlayer use the Playlist tab on the right to browse to the video you want and open it.

Go to the PotPlayer pull down menu and navigate to Video > Video Capture > Capture Consecutive Images..

When the Consecutive Image Capturer screen opens, select the Storage directory where you want the screenshot images to go to.
Next, go to the Numbers/Frames to Capture section. In this example, I selected “Every # ms” option and entered 10,000. This will produce a screenshot image every 10 seconds. If you want an image per second, enter 1000. You can also select “Every # frame” option. This will create a snapshot by the number of frames.

Open the storage folder that you designated in step 5.
Done!